Saturday, March 20, 2010

Ouu! A little egg box from Crazy 4 Crafting

One of the reasons I wanted to upgrade from my original Cricut to an Expression is so that I could cut boxes ... containers, really, of any kind.

Containers large enough to actually *contain* tiny gifts and things.

With the Expression, Cricut's Tags, Bags, Boxes & More cartridge is great. Honestly, though, if you take a second to check out Crazy 4 Crafting you will find the best, BEST ideas and .cut files (Gypsy files, too).

And our dear blogger, Cindy, likes to share. She shares for the cost of an easy-to-keep promise: Give credit where it's due.

Basically, don't take her ideas and pretend they are yours.

I've used a couple of her designs for gifts, and have played with nearly all of them for fun. They are Truly Amazing.

Did you read that? Truly. Amazing.

Today's ScrapShare are boxes for candy Easter eggs -- you know the ones. Cindy designed a large box for Cadbury size chocolate eggs and another for the mini eggs (think Butterfinger or Crunch or Palmer eggs).

I especially love her designs, and this one particularly, because you and I and everyone we know are trying to Not. Be. Pigs.

You can easily give each of your friends or co-workers or neighbors a fine treat without giving them oddles of crap none of us should eat.

In fact the small box holds just less than one serving size of sweets, so an individual or couple or family sharing a box ... a lovely treat that is damn near guilt free.

So you know, I have no personal connection to Cindy. As noted a few paragraphs previous, I've used a couple of her designs and played with most of them. I ran across her blog myself some months back: This isn't a sales pitch ... she's seriously got some amazing stuff you should check out.

Well? Go ... visit her ...

Random ribbon: A Drunken Stampers Challenge

My Guy was SO thrilled to be included in this week's Drunken Stampers Challenge! Because as I'm sure all of you know ... the non paper crafters in our households adore it when we give them crafty jobs!

ADORE IT. I said.

His job today was to choose a ribbon for the Drunken Stampers Ribbon Pull. The DS directive requires either a random choice from our ribbon bins or spool number 21 for those of you who are more organized.

My small collection of ribbons doesn't require it's own area (yet), so I plopped the ribbon bucket in My Guys lap and said "choose."

Oh, jeez, calm down everybody. I said, "PLEASE choose."

His pick was surprising and a bit annoying. Surprising because it's a somewhat girly ribbon (as if ribbon is ever anything except girly -- he said it reminded him of the nice Spring weather we've been having -- Awww).

The annoying part of his pick is the size. It's a wide ribbon -- about three quarters of an inch.

This is problematic for me because ribbon pretty much has to be woven, threaded or laced. I don't know why. I see other creations, beautiful pieces people build with a line of ribbon as a left hand border or a ribbon with a bow wrapped around a die cut. I always think they are so pretty.

But when I try it ... I can not get past the feeling that I've just glued some string to a piece of card stock.

So, My Guy's choice of wide ribbon would need some relatively large holes for weaving, threading or lacing.

Luckily I found this basket on my Cricut cartridge: Easter 2010. I modified it a bit (larger holes for the ribbon, hello), including removing a handle.

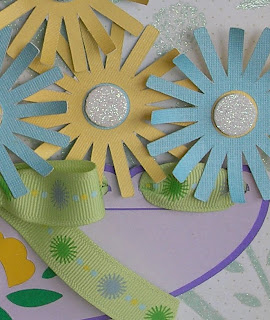
Oh, actually a super cool thing about the ribbon choice: Turns out that the pattern on the ribbon, "stick flowers," exactly matches a flower shape on another of my Cricut carts: Accent Essentials.

So odd.

Alright, at this point I chose the glitter-print paper on the background (Die Cuts With a View Garden Party), cut the sentiment and started gluing.

The basket and sentiment are set with sixteenth-inch foam, the yellow flowers are set with eighth-inch foam and the blue flowers are fairly teetering in place with quarter inch dots.

Every other flower petal was curled by a pull through my thumbnail and first finger and the flower centers are glittery pops thanks to hand-punched glitter foamies. There are a couple of glitter foamies dots elsewhere on the card as well.

By the way, foamies are an often overlooked but important addition to your card making toolbox. They are cheap, usually pre-stickied, add texture and height and take on beautiful, if sometimes strange, appearances when painted or stamped.

Come to think of it, I bet foamies are cool after heat embossing, too ... I bet they M.E.L.T! Or burst into flames and set the house on fire.

Maybe I'll try that later in the summer, outside and near the chiminea.

Springtime in the mailbox: Bitten contest

Finished up a card for the Drunken Stampers, which must have left me feeling very creative: I couldn't resist putting together something to submit for a contest at Bitten by the Bug 2.

Check out BB2 for a look at some very beautiful creations using Cricut.

On my card: The paper background is from a DCWV Ultimate Scrapbook stack, Seasons (it might be several years old).

The Cricut cuts, the daffodil and grass, are from the Easter 2010 cartridge. The flower is three layers of a base cut: Yellow, dark green and orange.

The yellow was trimmed so that the green stem and leaves are visible, and the third layer, the orange, has a hidden contour achieved in Design Studio (check out Capadia Designs for an explanation and LOTS of other amazing information).

Pressed embossing with a Cuttlebug adds texture to the yellow daffodil and the stamped butterflies also are embossed. A shadow blackout cut for the flower is done is lime green.

Our butterflies are from Martha Stewart stamps, inked and cut by hand. The embossing powder I used is clear with glitter set in hot pink ink.

After frying the embossing powder to a shiny, glimmering crystal texture the ink blends into the orange background appearing itself to be dark orange.

Finally, each of the cut items are set with 3D-Dots. The flower and grass are backed with eighth-inch thick dots and the butterflies have quarter-inch backers.

Tada!

Friday, March 19, 2010

Irish dance: A Drunken Stampers Challenge

This week's Drunken Stampers challenge, Irish Dance Dress, is a timely challenge and one that was fun to consider whilst enjoying Guinness, cabbage, potatoes and corned beef on Wednesday.

Drop by the Drunken Stampers blog to find out who are the newest DS designers!

Around my house this week I probably should have spent more time considering and less time enjoying. Oh well. Here we are with a  finished card to send to a friend (assuming those glitter glue dots ever dry).

The main flourish is from the Cricut Accent Essentials cartridge and the gold text is a stamped font finished with heat embossing.

Usually the embossing works beautifully for me, but this time I could NOT get the stamps to leave entirely clean images, so there's a bit of a fudge on the "girl" banner.

Too bad I was sober for that part -- I'd have an excuse for messing up.

Thursday, March 18, 2010

Kitchen tip: Magnetic clips

My tiny kitchen doesn't always allow enough space for ingredient prep, cooking and recipe display. Because of this we're always working to keep things off of counter tops.

Still, when using a new recipe or one with a lot of very specific ingredients the printed recipe has to be handy.

Magnets to the rescue. Obviously if you've got nothing on your refrigerator and the fridge is in a good location this can be a great place to hang a recipe while cooking.

But don't ignore the hidden magnetic display options. Behind the paint and texture and tape, a lot of our homes' finished corners are hiding metal corner supports. Yay!

Whether you use your fridge, a wall corner or the cook top hood you'll also need to ensure the magnet is strong enough to hold on even when it's got to penetrate layers of non-magnetic stuff.

Many of the stores where tough kitchen magnets are sold have metal shelving. If a magnetic clip set is in packaging with a cardboard back, just try to stick the cardboard against a metal shelf frame. If the magnets hold, they're probably tough enough.

For loose magnet clips, or ones in open packaging, find a magnetic surface and clip on your keys. Or, find something you can attach the clip to, then hold your keys up to the magnet on the back.

If it'll hold your keys without slipping ... it's perfect!

A few of my clips are tough enough to hold an entire magazine, open to the preferred recipe. When you come across clips that strong, pick up a handful of them ... you'll find yourself using them everywhere.

Wednesday, March 17, 2010

Finding the pot of gold

Rainbows often arch above our home that is in a bowl surrounded by hills and mountains. This double rainbow, photographed a few months ago, is my little gift to you for St. Patrick's Day.

Enjoy a pint, have a laugh with friends, serve dinner to your family: Do whatever fills your own pot with gold.

Sunday, March 14, 2010

Maximum mass o' marbles

A few weeks ago this space showed off some glass marble sun catchers inspired by a project from another blog.

Since that first day of inhaling adhesive fumes we've been considering the different decorations that could be created with a bunch of flat-back marbles and glue. Several ideas have crossed our minds, but this one was driving me nuts.

We love candles as it is, but consider the joy with a bouncing flame behind a wall of marbles! Yay! (Click on the photos for a larger view).

I chose a heavy-duty piece of stemware from Libby's Dollar Tree glassware (Dollar Tree stocks several different types of stemware ... these are the short, chubby, thick-as-soda-bottle glasses). If you try this project, be sure to choose a glass with a large bowl and mouth and thick glass. These are important factors for candle burning and application of marbles.

The adhesive I used, Aleen's Platinum Bond 7800, is advertised as being non-flammable, but I wouldn't take chances: Do not put a candle in or near this project until it's fully set (about 24 hours).

Also, this product comes with one of those piercing lids. You know the kind -- to open the container, remove lid, pierce top of tube, etc. Normally there's not much reason to worry about finessing this step. Pop off the lid, pierce the top and glue away.

However, this stuff can easily get away, slopping everywhere, so take a minute to carefully pierce only a small opening for the glue to escape.

When you've got the glue open, a clean glass, a protected work surface and a pile of marbles you're ready to create!

Start with a "line" or a "dotted ring" of glue around the top of the glass, about three quarters of inch from the rim.*

To ensure your adhesive has the best chance of drying securely, dip each marble in the line or dots of glue and set aside, in order of dipping, moving along the line until the line or dots have all been dipped.

Then, beginning from the first dipping point, apply the pre-dipped marbles. As much as possible, simply place the marble in it's appropriate spot and then, with a finger on the inside and another on the outside, holding the marble, pinch the marble into the adhesive.

Once you have a full circle of marbles, set the glass upright. The glue is not yet set, but this line of marbles is what will help you to apply the remaining lines.

So, for the next hour to two hours, flip the glass repeatedly to ensure the drying adhesive doesn't let the marbles slide (I flipped my glass every 20 minutes and was able to move on to the remaining marble lines in less than two hours).

*For each line of marbles, repeat the glue line, dip and application process. If you notice that the marbles are moving too much, stop and do the wait, flip, wait, flip thing until they've stiffened again.


After the entire globe is covered in marbles ... and the glue has dried ... you've got a candle holder that throws beautiful, dancing lights on surrounding surfaces.

Next time I'm going to choose a vessel with straight sides so I can ensure a more linear design. Also, I'll add a bit of tile grout to cover up the glue that shows around the edges of the marbles.

Who Are You?

I think I lied a couple of days ago, when I said I'd post more about a neat new project. Supposedly I was going to post that project yesterday, but My Guy took me out ... guess where we went?

Yay! Alice!

After an errand, a stop to see the baby chicks at the local feed store and a run to the grocer we arrived home to discover that Brown Santa had left a surprise from My Guy ... the 1933 version of Alice in Wonderland and Syfy's Alice that stars Caterina Scorsone, Tim Curry and Kathy Bates.

Um. Yeah. I more or less plopped down in the front of the ol' DVD player and didn't move much the rest of the day.

So, later today I'll post that promised project and maybe a couple of other things. But, lesson learned on those promises, no more absolutes. We'll be sticking to rougher estimates in the future ...

Friday, March 12, 2010

Today's project for tomorrow

A couple of hours today were spent with, well, creating something that could be very cool. We'll see.

Best of all in this project, if it works, is that it's cheap as hell, which makes it ideal for almost everyone I know.

In the meantime, here's a hint and a promise that even if it doesn't work out the way I hope I'll at least post the wreck and what I hope will fix it for a future finished project.

Thursday, March 11, 2010

Another Shepherd's Pie recipe

This house finds us using the refrigerator and pantry contents as a recipe as often as we use a printed, tested list of ingredients.

Today we again played with Shepherd's Pie -- something I've made a dozen times, but only once with a recipe. Even then we altered it unimaginably.

Two reasons I have little interest in an actual recipe are that this dish usually requires lamb (no freaking way) and lots of extra steps with separately-cooked vegetables added later (fun on occasion, but silly for something like this which SHOULD be an easy weeknight meal).

So, in our various attempts we've separately tried ground beef and ground turkey for the meat. The beef, even the extra-lean, is greasy but adds a lot of flavor. The turkey is not at all greasy and much healthier, but tastes, oddly, like turkey.

The best route is an even mix of super-lean ground beef and ground turkey, skillet browned with diced garlic.

Traditional Shepherd's Pie also has carrots and peas and an herb-filled gravy or juice with the meat. After trying a lot of options for vegetables we decided that the best route is the one mentioned earlier.

Check your fridge. Check your pantry. Do you have mushrooms? Good. Peas? Cool. Lima beans? OK! Carrots? Throw 'em in there. Onions, fennel, corn niblets, green beans, celery? Whatever, people.

Fresh vegetables will need to simmer longer, frozen vegetables hold up nicely and require less simmering and canned veg's work, too.

Eyeball your browned meat and garlic mixture, then add 50-percent more in vegetables. So, if you've got about two cups of meat, add one cup veggies (choose a mix of two or three).

Simmer your browned meat and vegetables with red wine and beef consomme or beef bouillon and water.

Brighten this with ground cayenne pepper, oregano, celery salt, ground pepper and sea salt. As this mixture simmers watch the liquid levels -- you don't want it to dry out, but it shouldn't be soup either. If it dries out add a bit more wine and broth. If it's too thin, try a little Wondra.

Finally, you need lots of whipped potatoes. Lots. Tonight's recipe at our house (for eight servings), took one pound each of ground turkey and beef and six medium russet potatoes, boiled, creamed and whipped.

Once your meat mixture and potatoes are ready, pour the meat mixture into a baking dish and top with the potatoes.

This final dish is baked for awhile to meld the flavors and broiled if you like a crispy top, but this doesn't have to be done immediately.

If you have a much larger freezer than ours you can cover the filled baking dish and freeze it, stick it in the fridge or go ahead and throw it in the oven.

A frozen Shepherd's Pie needs to be thawed in the fridge for a few hours before baking. A thawed, but still cold Pie should go into a 350 F oven for about an hour (but check occasionally as this will vary depending on how large/thick you prefer YOUR Pie).

 Don't forget to impress the nieces, nephews and grand kids: Instead of using one large baking dish, separate the filling and potato topping into cruets so the little ones can see his or her very own Shepherd's Pie come out of the oven.

Saturday, March 6, 2010

Inchies: A Drunken Stampers Challenge

This card is for the week's Drunken Stamper's challenge: Inchies.

Looking at Spike and Peg's work I think I might have missed the point, but I had fun anyway!

Let's start with the "features." The woman reading silhouette is from Dover Publications: If you're a Cricuter and use Sure Cuts A Lot you absolutely must pick up at least a few of the Dover clip art books. They've been invaluable to me for all sorts of random shapes. Dover's shapes can be imported directly from the disc that comes with the books or "reworked" in several applications before SCAL import.

Also, keep Dover in mind if all you're looking for are some really cool paper dolls for the little people in your life, stickers or fillers for stockings and birthday gift bags. Honest to Jebus. I love Dover. Sign up for the Dover e-mail newsletter -- they sent a weekly e-mail with special offers and printables that can be used for coloring pages, etc.

Oh, I don't own a color printer so I forget a lot, but Dover also produces some super books with copyright-free vintage labels and such (I know, I know I'm a gadget girl and only own a black and white laser jet printer -- but what the hell, it was $10 at the Thrift Depot in Sparks).

Alright ... back to the point ... card features ... after the main cut I added a background from a random card stock pack I found on clearance several years ago and a card stock frame with heat-embossed texture. The embossed design is actually a Halloween fence with cobwebs and a crow that I stamped at odd angles to create a grunge look (what do you think, Linda?).

The "Inchies" are stamped with the initials of my best friend and amazing woman, Aubry, to whom I will send this card despite the surprise being ruined as soon as I click "publish post."

These vintage newsprint letter stamps are foam-backed so I can press and "roll" against the page to ensure some edging is visible (that's the one thing I dislike about the new acrylic-mount stamps).

Then I used more of that fabulous heat embossing along with foam pop-ups beneath to match the frame that also is raised from the cover.

The Inchies are backed by flocked card stock from a Die Cuts With a View cover -- no kidding. I adore DCWV stacks with glitter and foil and flocked pages. And the covers, with "examples" on the front that also are glittered, foiled and flocked drive me nuts: Do people actually NOT use the covers?

Finally, the Inchies backers are set with pop ups and I'm left with a design technique that makes me want to do more, more, more.

Because if three Inchies have finally reinspired my non pink and pastel world ... what the hell might TWELVE do?

Friday, March 5, 2010

Lace and glitter

Yet again I'm making it in under the wire for a Drunken Stampers deadline.

Today's project mixed a bit of their challenge -- lace and glitter -- with a project I needed to finish this week: A box to hold a care package for a friend who has surgery on Thursday.

Don't worry, it's unlikely she'll have any complications during surgery: I'm sure about this as she's also my boss so I'd have to kick her ass if she were out more than the scheduled week.

This box is cool with a good interior space yet still small enough to be solid even built from card stock.

Tomorrow I'll post more about where I found this SVG file box. UPDATE: Alright, honestly, I am as usual moving on to other things, but dropped in to add this link because the Cricut-cut box is not my design and the creator deserves credit: The Project Girl.

Have a fantastic weekend all!

Thursday, March 4, 2010

Be The Buddha

Once in awhile I have trouble remembering to be calm and not flip out.

There've been a few years now in which I could have learned this -- less than 60, but more than 20 (I figure it's OK if, before I turned six, I only learned useful things like how to use Crayons to create fake wallpaper).

While discussing my temper with my mom I found out that she gave me my teeny, tiny tantrum-throwing talent. This came as a surprise to me: I don't remember her turning red and screaming at my sister or me, but I remember knowing that I had one chance to reach adulthood and not pissing off my parents was a reliable route.

So, deep down I probably knew my mom possessed the ability to cross the line from silly and fun to dragon lady (alright, maybe I remember one or two "fits"). By the way, this is something I think a lot of today's kids could use a dose of as well, but that's an entirely different subject.

Anyway, my point here is that I have a sometimes unpredictable temper and it's not my fault. However, to ensure I keep my own little Gila Monster in check I created a personal mantra: Be The Buddha.

Don't develop an individual philosophy based on this believing it is true to Buddhism, this is MY version.

Buddha is traditionally a happy kind of guy. Chubby, too, so you know he can get his grub on. He's always looking to help people out and is grateful for the little things. He always appears content to be Buddha.

Did I mention he's a happy and content kind of guy? Go to your favorite search engine and find a picture of Buddha. He's happy, right? He's content, correct?

I could have squished this entire post into two paragraphs:

This handmade sign is designed to remind me of my mantra: Be The Buddha. The mantra leads to the image of a happy, open, go-lucky guy. And the image leads to no more tantrum.

Whew. Another overreaction stopped in its tracks ...